This example example uses the Arduino or Genuino board to receive data from the computer. The board turns on an LED when it receives the character 'H', and turns off the LED when it receives the character 'L'.
The data can be sent from the Arduino Software (IDE) serial monitor, or another program like Processing (see code below), Flash (via a serial-net proxy), PD, or Max/MSP.
Hardware Required
- Arduino
- LED (optional)
- 220 ohm resistor (optional)
Software Required
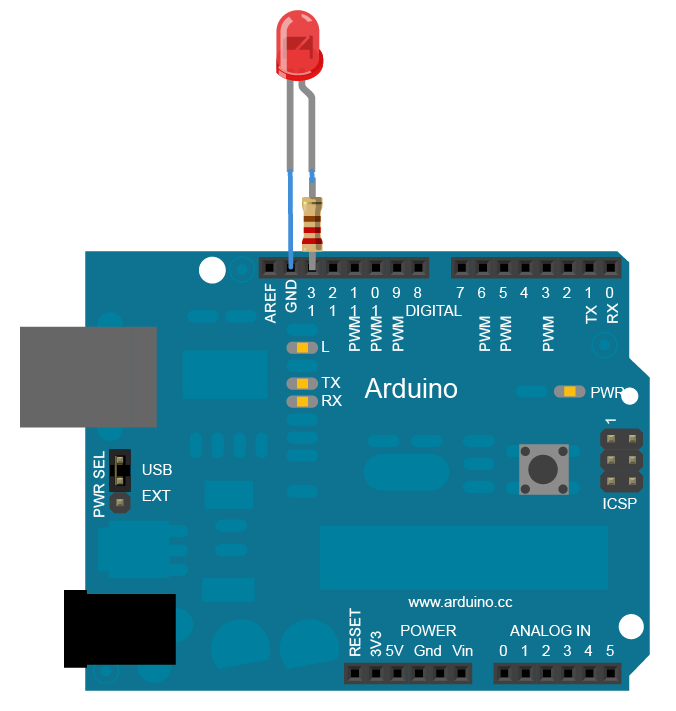
Circuit
Many Arduino and Genuino boards have a built-in LED connected to pin 13; if your board has no built-in LED, attach an external LED to pin 13. The long leg, or anode, goes to pin 13 through a 220 resistor. The short leg, or cathode, goes to ground.
click the image to enlarge
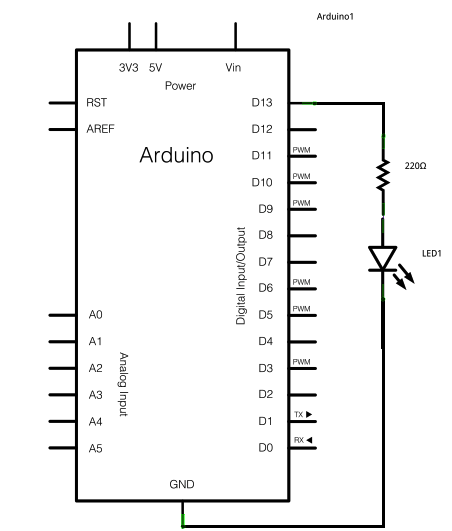
Schematic
click the image to enlarge
/*
  Physical Pixel

 An example of using the Arduino board to receive data from the
 computer.  In this case, the Arduino boards turns on an LED when
 it receives the character 'H', and turns off the LED when it
 receives the character 'L'.

 The data can be sent from the Arduino serial monitor, or another
 program like Processing (see code below), Flash (via a serial-net
 proxy), PD, or Max/MSP.

 The circuit:
 * LED connected from digital pin 13 to ground

 created 2006
 by David A. Mellis
 modified 30 Aug 2011
 by Tom Igoe and Scott Fitzgerald

 This example code is in the public domain.

 http://www.arduino.cc/en/Tutorial/PhysicalPixel
 */

const int ledPin = 13; // the pin that the LED is attached to
int incomingByte;      // a variable to read incoming serial data into

void setup()
{
    // initialize serial communication:
    Serial.begin(9600);
    // initialize the LED pin as an output:
    pinMode(ledPin, OUTPUT);
}

void loop()
{
    // see if there's incoming serial data:
    if (Serial.available() > 0)
    {
        // read the oldest byte in the serial buffer:
        incomingByte = Serial.read();
        // if it's a capital H (ASCII 72), turn on the LED:
        if (incomingByte == 'H')
        {
            digitalWrite(ledPin, HIGH);
        }
        // if it's an L (ASCII 76) turn off the LED:
        if (incomingByte == 'L')
        {
            digitalWrite(ledPin, LOW);
        }
    }
}

/* Processing code for this example

 // mouseover serial

 // Demonstrates how to send data to the Arduino I/O board, in order to
 // turn ON a light if the mouse is over a square and turn it off
 // if the mouse is not.

 // created 2003-4
 // based on examples by Casey Reas and Hernando Barragan
 // modified 30 Aug 2011
 // by Tom Igoe
 // This example code is in the public domain.


 import processing.serial.*;

 float boxX;
 float boxY;
 int boxSize = 20;
 boolean mouseOverBox = false;

 Serial port;

 void setup() {
 size(200, 200);
 boxX = width/2.0;
 boxY = height/2.0;
 rectMode(RADIUS);

 // List all the available serial ports in the output pane.
 // You will need to choose the port that the Arduino board is
 // connected to from this list. The first port in the list is
 // port #0 and the third port in the list is port #2.
 // if using Processing 2.1 or later, use Serial.printArray()
 println(Serial.list());

 // Open the port that the Arduino board is connected to (in this case #0)
 // Make sure to open the port at the same speed Arduino is using (9600bps)
 port = new Serial(this, Serial.list()[0], 9600);

 }

 void draw()
 {
 background(0);

 // Test if the cursor is over the box
 if (mouseX > boxX-boxSize && mouseX < boxX+boxSize &&
 mouseY > boxY-boxSize && mouseY < boxY+boxSize) {
 mouseOverBox = true;
 // draw a line around the box and change its color:
 stroke(255);
 fill(153);
 // send an 'H' to indicate mouse is over square:
 port.write('H');
 }
 else {
 // return the box to it's inactive state:
 stroke(153);
 fill(153);
 // send an 'L' to turn the LED off:
 port.write('L');
 mouseOverBox = false;
 }

 // Draw the box
 rect(boxX, boxY, boxSize, boxSize);
 }
 */
Processing Code
Copy the Processing code from the code sample above. As you mouse over the center square, the LED on pin 13 should turn on and off. The Processing applet looks like this:
Mouse over the square to turn the LED on and off.