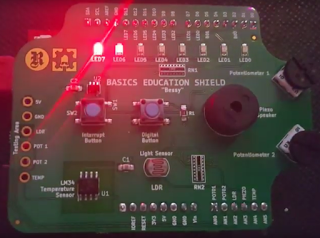
The Learning Lab Kit on a Shield for Arduino

Received this Learning Lab Kit on a Shield for Arduino from Programming Electronics Academy today and am very pleased.
The Learning Lab Kit on a Shield for Arduino is meant to help you save time – it basically pre-populates common circuits for you.
Circuits that you might already have learned quite well – like LED, potentiometer, or push buttons.
Instead of searching your shag carpet for the 220 ohm resistor that dropped last week, you simply use the Basic Electronics Arduino Shield – and it connects everything up for you. No need to breadboard the circuits out.
So when you sit down for 20-30 minutes to practice coding on Arduino – then you spend the majority of the time getting to try new things, and less time repeating something you already know.
I couldn't wait to play with mine today
// place pins of leds in an array for easy indexing
int ledPins[] = {6, 7, 8, 9, 10, 11, 12, 13};

// how long to hold pattern for visibility
#define BLINKDELAY 140
int blinkDelay = BLINKDELAY;
// amount to decrrease delay on while progressing through pattern giving
// the effect of momentum picking up
int blinkIncrement = 20;
// number of leds
int leds = 8;

void setup()
{
    // Set pins used for leds to output mode.
    for(int i = 0; i < sizeof(ledPins); i++)
    {
        pinMode(ledPins[i], OUTPUT);
    }
}

void loop()
{
    //turn each led on and off in order starting from ledPins[0]
    // and finishing on ledPins[7]
    blinkDelay = BLINKDELAY;
    for (int i = 0; i < leds; i++)
    {
        digitalWrite(ledPins[i], HIGH);
        if (i!=0)
        {
            digitalWrite(ledPins[i-1], LOW);
        }
        delay(blinkDelay);
        blinkDelay = blinkDelay - blinkIncrement;
    }
    blinkDelay = BLINKDELAY;
    //turn each of the pins on and off in order starting from ledPins[7]
    // and finishing on ledPins[0]
    for (int i = leds-1; i > -1; i--)
    {
        digitalWrite(ledPins[i], HIGH);
        if (i!=leds-1)
        {
            digitalWrite(ledPins[i+1], LOW);
        }
        delay(blinkDelay);
        blinkDelay = blinkDelay - blinkIncrement;
    }
}
Comments
comments powered by Disqus