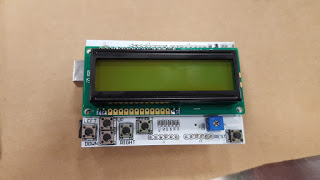
LCD Button Shield V2 for Arduino by Sparkfun

TheLCD Button Shield from Sparkfun Electronics provides a 16x2 LCD screens along with a keypad consisting of 5 keys — select, up, right, down and left. With this shield you will be able to move through menus and make selections straight from one board attached to your Arduino without requiring a massive tower of shields.
The LCD Button Shield V2 works perfectly in 4-bit mode with the “LiquidCrystal” library found in the Arduino IDE.
NOTE: The pin hook up used by this shield is different from the samples in the library.
    **The circuit used in Arduino library is usually wired as:**

    \* LCD RS pin to digital pin 12
    \* LCD Enable pin to digital pin 11
    \* LCD D4 pin to digital pin 5
    \* LCD D5 pin to digital pin 4
    \* LCD D6 pin to digital pin 3
    \* LCD D7 pin to digital pin 2
    \* LCD R/W pin to ground
    \* 10K resistor:
    \* ends to +5V and ground
    \* wiper to LCD VO pin (pin 3)

    ** The circuit on the shield is  wired as:**

    \* LCD RS pin to digital pin 8
    \* LCD Enable pin to digital pin 9
    \* LCD D4 pin to digital pin 4
    \* LCD D5 pin to digital pin 5
    \* LCD D6 pin to digital pin 6
    \* LCD D7 pin to digital pin 7
    \* LCD R/W pin to ground
    \* 10K resistor:
    \* ends to +5V and ground
    \* wiper to LCD VO pin (pin 3)
The keypad consisting of 5 keys are arranged in a voltage ladder connected to A0. Each key press produces a unique value ranging from 0 to 1023. Pressing multiple keys together will generate unique values as well. When I wrote the demo program to test the shield I would use the serial monitor to see the analogue values read for each key then I adjusted my code to accept values ranging within +- 10 of the value read.
Here is a short video of the shield with the demo code below:
/*
  LiquidCrystal Using Sparkfun LCD Button shield
  https://www.sparkfun.com/products/13293
  NOTE:   This uses different hook up than what the examples in the arduino library use.  see The circuit:
 * LCD RS pin to digital pin 12  (8 for shield)
 * LCD Enable pin to digital pin 11 (9 for shield)
 * LCD D4 pin to digital pin 5   (D4)
 * LCD D5 pin to digital pin 4   (D5 for shield)
 * LCD D6 pin to digital pin 3   (D6 for shield)
 * LCD D7 pin to digital pin 2   (D7 for shield)
 * LCD R/W pin to ground
 * 10K resistor:
 * ends to +5V and ground
 * wiper to LCD VO pin (pin 3)
 */

// include the library code:
#include <LiquidCrystal.h>

// initialize the library with the numbers of the interface pins
// for the sparkfun shield
LiquidCrystal lcd(8, 9, 4, 5, 6, 7);

void setup()
{
    // set up the LCD's number of columns and rows:
    lcd.begin(16, 2);
    Serial.begin(9600);  //for debugging

}

char* buttons[] = {"Left", "Up", "Down", "Right", "Select", "Undefined"};

#define LEFT_BUTTON     0
#define UP_BUTTON       1
#define DN_BUTTON       2
#define RIGHT_BUTTON    3
#define SEL_BUTTON      4
#define UNDEFINED       5

int buttonindex;

void loop()
{
    int buttonValue = 1023;
    lcd.clear();
    lcd.print("Press Any Button");

    while (buttonValue > 1015)
    {
        buttonValue = analogRead(A0);
        Serial.println(buttonValue);
    }

    if (buttonValue > 845 && buttonValue < 865)  // left button
    {
        buttonindex = LEFT_BUTTON;
    }
    else if (buttonValue > 915 && buttonValue < 949)  // UP button
    {
        buttonindex = UP_BUTTON;
    }
    else if (buttonValue > 895 && buttonValue < 910) // down button
    {
        buttonindex = DN_BUTTON;
    }
    else if (buttonValue > 810 && buttonValue < 820) // right button
    {
        buttonindex = RIGHT_BUTTON;
    }
    else if (buttonValue > 605 && buttonValue < 620) // select button
    {
        buttonindex = SEL_BUTTON;
    }
    else buttonindex = UNDEFINED;
    lcd.clear();
    lcd.print(buttons[buttonindex]);
    lcd.print("  pressed");
    // wait for key to be releasted

    while (buttonValue < 1000)
    {
        buttonValue = analogRead(A0);
    };  // sit in this loop till key unpressed

}
Click Here to pick up one of these shields for your next project
David Riewe
Published
Wed 30 December 2015
Comments
comments powered by Disqus