A Simple LED Clock using Particle Photon
This is a simple LED clock I prototyped following Simon Monks post.
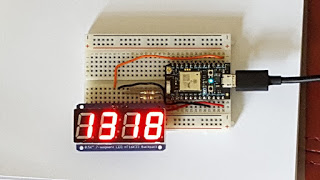
I am using a Particle Photon, a couple 4.7k resistors and a 7 Seg Display with an Adafruit I2C backpack.
The 7-segment LED backpack is obtaining it's power from the VIN pin of the Photon, which is 5 volts. In order for the D0 (data) and D1 (clock) pins to interface with the backpack they are pulled high via 4.7k resistors through the 3V3 line. These pullups are needed so that the Photon can drive a logic 1 on those lines.
Software
Go to http://particle.io and select the BUILD option to open the web IDE.
Create a new 'App' and call it LCD_Clock.
This project requires the SPARKTIME and ADAFRUIT-LED-BACKPACK LIBRARIES, add these by clicking the libraries button, find each of these libraries in turn and click USE THIS LIBRARY selecting your new LCD_Clock app when asked to select the app.
Now you can paste the following code into your App. Note that the includes should already be there if the libraries have been imported correctly.
You will need to change your time zone offset on the last line of setup.
That's it - the display should start as soon as the Photon resets.
 #include "SparkTime/SparkTime.h"
 #include "adafruit-led-backpack/adafruit-led-backpack.h"

Adafruit_7segment matrix = Adafruit_7segment();
UDP UDPClient;
SparkTime rtc;

unsigned long currentTime;
unsigned long lastTime = 0UL;
String timeStr;
int colon = false;

void setup()
{
  matrix.begin(0x70);
  matrix.setBrightness(15);
  rtc.begin(&UDPClient, "north-america.pool.ntp.org");
  rtc.setTimeZone(0); // gmt offset
}

void loop()
{
  currentTime = rtc.now();
  int min = rtc.minute(currentTime);
  int hour = rtc.hour(currentTime);
  matrix.print(hour * 100 + min, DEC);
  colon = ! colon;
  matrix.drawColon(colon);
  matrix.writeDisplay();
  delay(500);
}
Check out Simons book for more experiments like this

Comments
comments powered by Disqus